Cycling hand signals: turning and stopping in Moscow
New city, familiar bike, different signals
After two or three months on a road bike, changing gears may feel natural while taking a hand off the bars still feels awkward. Add unfamiliar Moscow traffic and there is plenty to think about. Start by learning a few clear signals, then practise them away from traffic.
This guide follows Russian road rules, specifically sections 8.1–8.2 of the Traffic Rules. Signals and cycling restrictions can differ in other countries. Do not assume that the braking gesture you learnt at home means the same thing here.
Keep road signals separate from club conventions. A signal that your riding friends understand may mean little to a driver.
The road signals used in Russia
Left turn. Take your left hand off the bars and extend your left arm straight out to the left, roughly at shoulder height. Keep the elbow straight. There is also a permitted alternative: extend your right upper arm to the right, bend the elbow at a right angle and point your forearm upwards. Your forearm is the part between your elbow and wrist.
Right turn: both permitted options. Extend your right arm straight out to the right, roughly at shoulder height. Alternatively, extend your left upper arm to the left, bend the elbow at a right angle and point your forearm vertically upwards. Your wrist is above your elbow. Use the option that lets you control the bike confidently; a straight arm towards the turn is easier to match to the intended direction.
Braking, including an upcoming stop. Raise either your left or your right arm upwards. Russia’s legal braking signal is an arm raised up. Make it distinct from the bent-arm turn signal: do not hold your upper arm horizontally out to the side with the forearm at a right angle, as in the turning alternative.
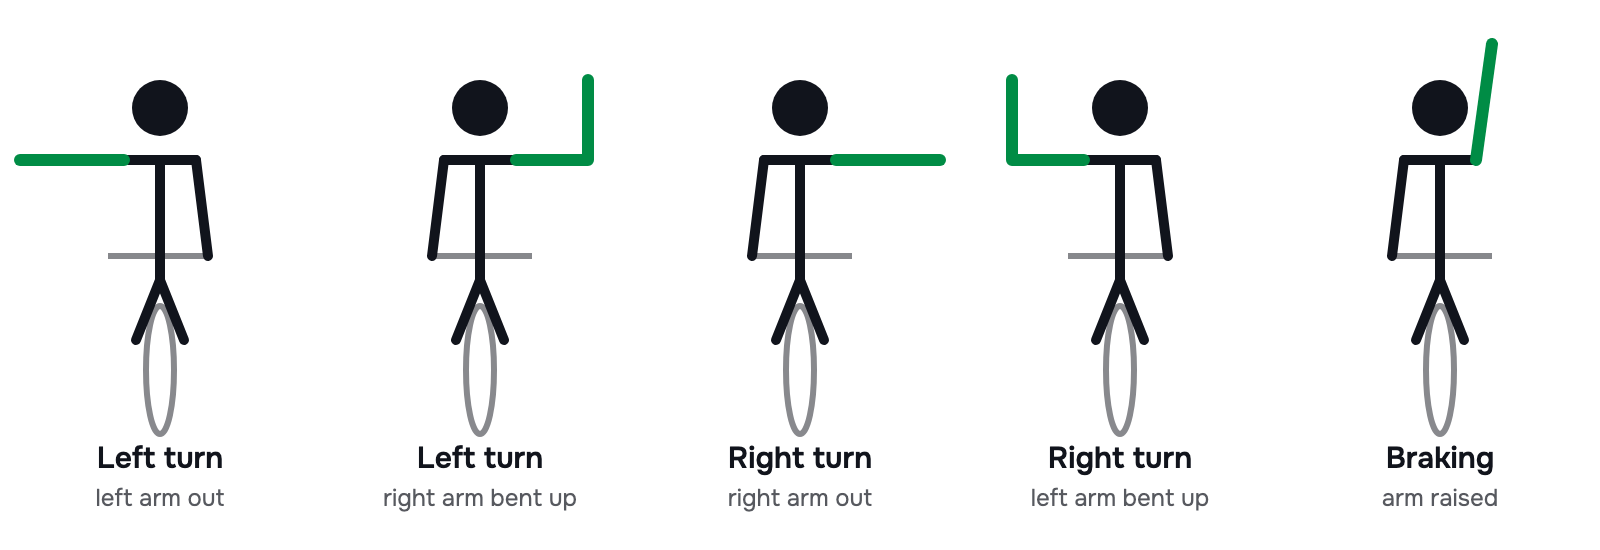
For each signal, give advance notice before turning, changing lanes or braking. Hold it long enough to make your intention visible. The rules do not specify a number of seconds or a distance. Avoid misleading timing, such as indicating before several side roads when you mean the last one.
Section 8.2 allows a hand signal to end immediately before the manoeuvre. Put your hand back on the bars so you can steer and brake properly. A signal does not give you priority: check that the move is safe rather than assuming somebody will let you through.
A left-turn signal is not permission to make every left turn. Section 24.8 restricts cyclists’ left turns and U-turns on roads with tram traffic or more than one lane in their direction, with exceptions specified in the rules. If you are unsure, choose a pedestrian crossing, dismount and cross on foot under the pedestrian rules.
Keep the bike steady
Practise on a flat, empty area first. Ride straight at a comfortable speed and check the surface ahead before lifting a hand. Do not try it over a pothole, during a turn or while braking hard. Keep your remaining hand secure without tensing your shoulders. On drop handlebars, choose a position from which you can reach the brake lever.
Look towards your path, not at your signalling hand. Before moving sideways, make a brief shoulder check for traffic behind you while keeping your line. Practise looking back separately before combining it with signalling. Then signal, return your hand and check that the manoeuvre is still safe.
If you need to brake suddenly, keep control and brake first. Warn nearby riders with your voice. Staying upright matters more than completing a gesture.
Agree on group signals before a Moscow ride
Ask the ride leader—the person guiding the group—to demonstrate the signals before you leave. These are examples of club conventions, not a universal code:
- Pothole or surface hazard: point down on the side of the hazard without leaning towards it. Add “Hole right!” or “Hole left!” and give riders behind time to react. Avoid a sudden swerve.
- Slowing down: one convention is an open hand facing down with a small up-and-down movement. Call “Slowing!” and reduce speed smoothly.
- Stopping: call “Stopping!” early and use the raised-arm road signal for other road users. A club may also use a fist behind the back; confirm its meaning first.
- Changing position or passing a parked vehicle: check behind before indicating your intended direction. Some groups use a hand behind the back pointing towards the side to move to. It does not replace the legal road turn signal.
- Car behind: call “Car behind!” and pass the warning towards the front. Keep your line; the call is information, not an instruction to dart towards the kerb.
If you are joining a Russian-speaking group, agree on words everybody understands. Useful phrases are «Яма справа!» (Yama sprava, “Hole right!”), «Тише!» (Tishe, “Slow down!”), «Стоп!» (Stop) and «Машина сзади!» (Mashina szadi, “Car behind!”). Try saying them together before the ride rather than learning them in traffic.
Common beginner mistakes
Signalling as you turn gives others too little notice. Watching your hand can pull your attention away from your line. A sudden move around a hole can surprise the rider behind. Assuming every club uses the same fist signal can cause confusion. Following somebody else’s signal without checking traffic is another trap: make your own safety check.
What to do now
- Practise riding straight, looking briefly behind and making each Russian road signal separately on an empty flat area. Return your hand before turning or braking.
- Before your next club ride, ask for a demonstration of hazard, slowing, stopping and position-change signals. Agree on spoken warnings in a shared language.
- Pick a familiar quiet route and identify turns and stopping points in advance. Rehearse the sequence: check, signal, hand back, safe manoeuvre.
Updated: October 2026